搭建apache
下载地址
http://httpd.apache.org/在安装过程中会有这种问题
configure: error: APR not found. Please read the documentation.所以,需要安装APR
下载地址
http://apr.apache.org/download.cgi安装步骤:
cd apr-1.6.5/
./configure --prefix=/Users/miss/server/apr
make
make install
然后接下来安装apr-util
cd apr-util-1.6.1/
./configure --prefix=/Users/miss/server/apr-util --with-apr=/Users/miss/server/apr
make
make install
然后我们继续安装apache
cd httpd-2.4.37/
./configure --prefix=/Users/miss/server/apache --with-apr=/Users/miss/server/apr --with-apr-util=/Users/miss/server/apr-util
发现报错为
configure: error: pcre-config for libpcre not found. PCRE is required and available from http://pcre.org/好吧,我们安装一下pcre
下载地址
https://ftp.pcre.org/pub/pcre/嗯,友情提示,不要下载pcre2
cd pcre-8.42/
./configure --prefix=/Users/miss/server/pcre
make
make install
好,继续我们的安装
./configure --prefix=/Users/miss/server/apache --with-apr=/Users/miss/server/apr --with-apr-util=/Users/miss/server/apr-util --with-pcre=/Users/miss/server/pcre
make
make install
好的,安装完成
开始启动apache
./apache/bin/apachectl -k start发现报错
AH00558: httpd: Could not reliably determine the server's fully qualified domain name, using ::1. Set the 'ServerName' directive globally to suppress this message好,进入到/apache/conf目录
编辑httpd.conf文件,搜索”#ServerName”,添加ServerName localhost:80
然后继续重启,发现又报错了
(13)Permission denied: AH00072: make_sock: could not bind to address [::]:80
(13)Permission denied: AH00072: make_sock: could not bind to address 0.0.0.0:80
原因是像apache这种服务,都是系统级别的,普通管理员没有权限,那么以下方法可以
sudo su
***** //输入密码
./apache/bin/apachectl -k start
OK,搞定,没有报任何错,然后浏览器输入
localhost看到如下页面就说明成功了

安装PHP
首先下载PHP
http://php.net/下面网址是所有版本的集合,可以根据自己的需要安装
http://www.php.net/releases/本次我安装的版本是5.6.37
下载地址:
http://cn2.php.net/distributions/php-5.6.37.tar.gz安装
cd php-5.6.37/
./configure --prefix=/Users/miss/server/php/php-5.6.37
make
make install
增加apache对PHP的解析
需要打开httpd.conf 增加libphp5.so,但是找了半天,发现,居然没有生成,我们接下来解决这个问题
make clean //清楚刚才的参数
./configure --prefix=/Users/miss/server/php/php-5.6.37 --with-apxs2=/Users/miss/server/apache/bin/apxs
make
make install
有心的读者就会发现,再重新编译PHP的时候,多了一个参数,那就是 --with-apxs2,对的,就是这个参数,这个参数指定我们上一步安装apache之后apxs的位置
经过上面的步骤之后,我们赶紧去找找是否生成了libphp5.so
好的,我们惊奇的发现在
apache/modules/libphp5.so出现了,出现了,更惊奇的还在后面,赶紧打开apache 的配置文件发现
LoadModule php5_module modules/libphp5.so自动帮我们加上了扩展
首先找到apache的配置文件httpd.conf
然后搜索
IfModule mime_module然后在里面加入
AddType application/x-httpd-php .php一定要在里面添加,否则不会生效
    #
    # TypesConfig points to the file containing the list of mappings from
    # filename extension to MIME-type.
    #
    TypesConfig conf/mime.types

    #
    # AddType allows you to add to or override the MIME configuration
    # file specified in TypesConfig for specific file types.
    #
    #AddType application/x-gzip .tgz
    #
    # AddEncoding allows you to have certain browsers uncompress
    # information on the fly. Note: Not all browsers support this.
    #
    #AddEncoding x-compress .Z
    #AddEncoding x-gzip .gz .tgz
    #
    # If the AddEncoding directives above are commented-out, then you
    # probably should define those extensions to indicate media types:
    #
    AddType application/x-compress .Z
    AddType application/x-gzip .gz .tgz

    #
    # AddHandler allows you to map certain file extensions to "handlers":
    # actions unrelated to filetype. These can be either built into the server
    # or added with the Action directive (see below)
    #
    # To use CGI scripts outside of ScriptAliased directories:
    # (You will also need to add "ExecCGI" to the "Options" directive.)
    #
    #AddHandler cgi-script .cgi

    # For type maps (negotiated resources):
    #AddHandler type-map var

    #
    # Filters allow you to process content before it is sent to the client.
    #
    # To parse .shtml files for server-side includes (SSI):
    # (You will also need to add "Includes" to the "Options" directive.)
    #
    #AddType text/html .shtml
    #AddOutputFilter INCLUDES .shtml
    AddType application/x-httpd-php .php //添加在这里
然后再搜索
DirectoryIndex index.html然后在后面加上,最后的是这样的
DirectoryIndex index.html index.php然后保存文件,重启apache,OK,搞定,现在apache就会支持解析PHP语句了,我们在
apache/htdocs //在这个文件夹里面加入PHP文件 测试
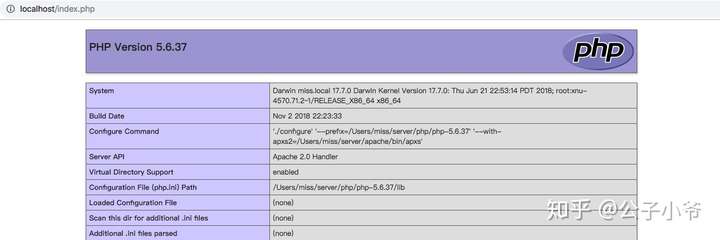
例如,加入index.php
echo phpinfo();然后打开浏览器输入
localhost/index.php如果,你看到下面的内容说明已经成功了。
那现在还有个问题,那就是,我不想在apache默认的目录下面写代码,我想自己单独建立一个文件夹来专门管理我的各个网站怎么办呢?
还是更改配置文件
找到
DocumentRoot "/work" //更改这里的文件夹位置
 //这里同上
    #
    # Possible values for the Options directive are "None", "All",
    # or any combination of:
    #   Indexes Includes FollowSymLinks SymLinksifOwnerMatch ExecCGI MultiViews
    #
    # Note that "MultiViews" must be named *explicitly* --- "Options All"
    # doesn't give it to you.
    #
    # The Options directive is both complicated and important.  Please see
    # http://httpd.apache.org/docs/2.4/mod/core.html#options
    # for more information.
    #
    Options Indexes FollowSymLinks

    #
    # AllowOverride controls what directives may be placed in .htaccess files.
    # It can be "All", "None", or any combination of the keywords:
    #   AllowOverride FileInfo AuthConfig Limit
    #
    AllowOverride None

    #
    # Controls who can get stuff from this server.
    #
    Require all granted
然后保存,重启apache,就可以在自定义的文件夹下面写PHP文件了
安装mysql
下载地址
https://www.mysql.com/地址:
https://dev.mysql.com/downloads/mysql/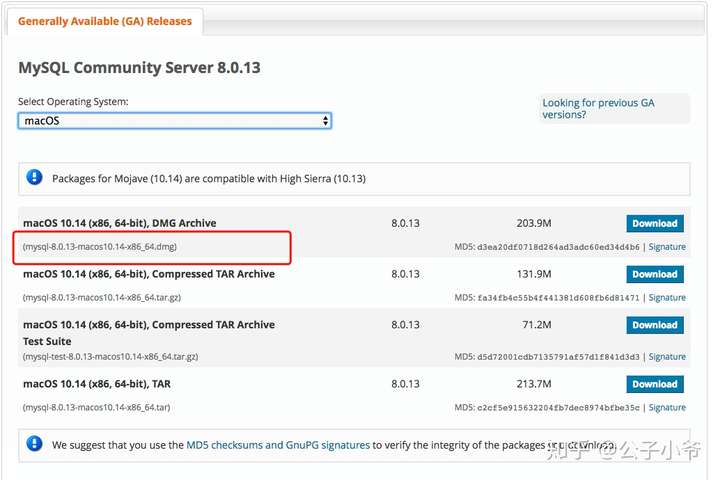
如果你觉得编译安装太麻烦了,那就下载图上那个,这个是Mac的安装包,就不用编译安装了
下载完,下一步下一步就OK了
文档地址:
https://dev.mysql.com/doc/refman/8.0/en/osx-installation-pkg.html接下来我来演示的是编译安装
下载地址:
https://cdn.mysql.com//Downloads/MySQL-8.0/mysql-8.0.13-macos10.14-x86_64.tar.gz嗯,需要说明一点的是,下载下来的安装更简单,因为本身就是编译好的,所以,只要解压,就算是安装完成了。
我们知道运行mysql就不用root用户或者当前登陆用户了,通常我们默认的用户是mysql用户,在Mac系统中,这个用户是已经默认建立好了,不过稍微有点不同,是叫
_mysql如果查看当前的用户呢?
sudo su
****** //输入密码
cd /etc
cat passwd
我们发现,这个用户的默认文件夹是
/var/dump所以我们需要修改这个文件夹
运行一下命令修改
sudo su
***** //输入密码
cd /etc
vim passwd
找到
_mysql:*:74:74:MySQL Server:/var/dump:/usr/bin/false

然后把/var/dump改成自己的目录,下面的操作,就用mysql来代替了

然后保存推出
现在给mysql文件赋予权限
chown _myslq:_mysql mysql
chmod 755 mysql
然后最重要的一点来了,这一点决定了mysql到底以后能不能用

那就是初始化

记住一个选项 那就是
--initialize
如果有需要的话,可以查看这篇mysql的文档,下面是文档地址
https://dev.mysql.com/doc/refman/5.7/en/binary-installation.html

cd /mysql/bin
./mysqld --initialize --datadir=/mysql/data --user=_mysql --basedir=/mysql
好的,初始化完成,如果你看到如下信息,那就说明成功了
2018-11-03T07:39:49.704661Z 0 [System] [MY-013169] [Server] /Users/miss/server/mysql/bin/mysqld (mysqld 8.0.13) initializing of server in progress as process 20651
2018-11-03T07:39:49.716012Z 0 [Warning] [MY-010159] [Server] Setting lower_case_table_names=2 because file system for /Users/miss/server/mysql/data/ is case insensitive
2018-11-03T07:39:51.748148Z 5 [Note] [MY-010454] [Server] A temporary password is generated for root@localhost: q_s&t_tbh6jE
2018-11-03T07:39:53.707537Z 0 [System] [MY-013170] [Server] /Users/miss/server/mysql/bin/mysqld (mysqld 8.0.13) initializing of server has completed
可能有读者注意到,第二行有个warning,好的,我来解析一下这个是什么东西
在MySQL中,数据库对应数据目录中的目录。数据库中的每个表至少对应数据库目录中的一个文件(也可能是多个,取决于存储引擎)。因此,所使用操作系统的大小写敏感性决定了数据库名和表名的大小写敏感性。
在大多数Unix中数据库名和表名对大小写敏感,而在Windows中对大小写不敏感。一个显著的例外情况是Mac OS X,它基于Unix但使用默认文件系统类型(HFS+),对大小写不敏感。然而,Mac OS X也支持UFS卷,该卷对大小写敏感,就像Unix一样。
变量lower_case_file_system说明是否数据目录所在的文件系统对文件名的大小写敏感。ON说明对文件名的大小写不敏感,OFF表示敏感。
在windos中,这个值会默认为1
windows系统对大小写不敏感,mysql也默认设置为对大小写不敏感。
linux下:
数据库名与表名是严格区分大小写的;
表的别名是严格区分大小写的;
列名与列的别名在所有的情况下均是忽略大小写的;
变量名也是严格区分大小写的;
windows下:
都不区分大小写
Mac OS下(非UFS卷):
都不区分大小写
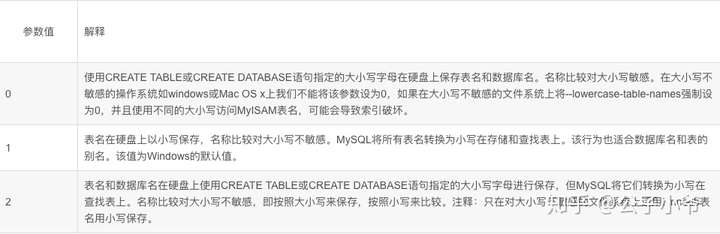
unix下lower_case_table_names默认值为 0 .Windows下默认值是 1 .Mac OS X下默认值是 2
为了避免大小写引发的问题,一种推荐的命名规则是:在定义数据库、表、列的时候全部采用小写字母加下划线的方式,不使用任何大写字母
在任何系统中可以使用lower_case_tables_name=1。使用该选项的不利之处是当使用SHOW TABLES或SHOW DATABASES时,看不出名字原来是用大写还是小写。
请注意在Unix中如果以前lower_case_tables_name = 0将lower_case_tables_name设置为1之前,重启mysqld之前,必须先将旧的数据库名和表名转换为小写。
好的,我们来看第三行,当你初始化之后,会给你生成一个默认一个默认的密码,账号是root
请复制这个密码并保存,后续更改密码会要用。
然后还有一个额外的东西,需要说明的
mysql_ssl_rsa_setup //在mysql/bin目录下在mysql5.7以后的版本增加来这个文件,这个文件是干啥的呢,我们来解释一下。
./mysql/bin/mysql_ssl_rsa_setup --datadir=/mysql/data如果你执行了这个命令,那么你就开启ssl
这样的话,就会使用SSL加密连接的
我们知道,MySQL5.7之前版本,安全性做的并不够好,比如安装时生成的root空密码账号、存在任何用户都能连接上的test库等,导致数据库存在较大的安全隐患。好在5.7版本对以上问题进行了一一修复。与此同时,MySQL 5.7版本还提供了更为简单SSL安全访问配置,且默认连接就采用SSL的加密方式,这让数据库的安全性提高一个层次。
ssl介绍
SSL(Secure Socket Layer:安全套接字层)利用数据加密、身份验证和消息完整性验证机制,为基于TCP等可靠连接的应用层协议提供安全性保证。
SSL协议提供的功能主要有:
1、 数据传输的机密性:利用对称密钥算法对传输的数据进行加密。
2、身份验证机制:基于证书利用数字签名方法对服务器和客户端进行身份验证,其中客户端的身份验证是可选的。
3、 消息完整性验证:消息传输过程中使用MAC算法来检验消息的完整性。
MySQL5.7 SSL配置和启用
1、安装时启动SSL
在MySQL5.7安装初始化阶段,我们发现比之前版本多了一步操作,而这个操作就是安装SSL的。
bin/mysqld --initialize --user=mysql  # MySQL 5.7.6 and up
bin/mysql_ssl_rsa_setup   # MySQL 5.7.6 and up
当运行完这个命令后,默认会在data_dir目录下生成以下pem文件,这些文件就是用于启用SSL功能的:

如果用户是采用本地localhost或者sock连接数据库,那么不会使用SSL方式了。
下面启动mysql
./mysql/bin/mysqld_safe --user=_mysql &查看mysql是否启动成功了
ps aux | grep mysql如果你看到如下提示说明成功了
_mysql           20773   0.3  4.7  4888776 397744 s001  S     4:04下午   0:00.97 /Users/miss/server/mysql/bin/mysqld --basedir=/Users/miss/server/mysql --datadir=/Users/miss/server/mysql/data --plugin-dir=/Users/miss/server/mysql/lib/plugin --user=_mysql --log-error=miss.local.err --pid-file=miss.local.pid
root             20777   0.0  0.0  4267752    876 s001  S+    4:04下午   0:00.01 grep mysql
root             20706   0.0  0.0  4279600   1408 s001  S     4:04下午   0:00.03 /bin/sh ./mysqld_safe --user=_mysql
接下来,我们用客户端链接一下mysql
./mysql/bin/mysql -u root -p
****** //这里填写密码,这里的密码就是当初始化完成的时候,mysql给的默认密码
如果你看到如下信息表示mysql已经链接上服务器了
Welcome to the MySQL monitor.  Commands end with ; or g.
Your MySQL connection id is 8
Server version: 8.0.13

Copyright (c) 2000, 2018, Oracle and/or its affiliates. All rights reserved.

Oracle is a registered trademark of Oracle Corporation and/or its
affiliates. Other names may be trademarks of their respective
owners.

Type 'help;' or 'h' for help. Type 'c' to clear the current input statement.

mysql>
其实,即使你不改密码的话,你也操作不了客户端,mysql在第一次进入的时候,是强制必须更换密码的。
cd /mysql/bin/
./mysqladmin -u root -p password 123 //123是新改的密码,可以根据自己需要更改
Enter password: //这里输入默认的密码
OK,到了这一步,密码就更改完成了,可以用新的密码来登陆一下。
评论列表(0条)